As stagers, we are always coming up with new and inventive ways to inexpensively add that “WOW” factor to our clients’ homes. One of the most effective ways to spruce up a room is to add fabric valances to your windows. Today I will share with you one of the methods we use to create beautiful valances with minimal time, skill and cost. There is no hardware to hang, all you need are rubber bands, a couple of nails, a hammer and double stick tape.
First, measure the width of your window(s). Now, determine the length of the drop on each side of the window. You need to decide what will look best on your particular window. Generally, you will want to choose one of three options; a short, scarf like end of only a few inches, sill length or floor length . Add the measurements for the drop for both sides with the width measurement, and add an extra 18 inches. It doesn’t need to be exact, as you will be able to adjust it when hanging. Better to have too much than not enough.
Now choose a fabric. Usually fabric comes in one of two widths, 45” or 60”. Since your valance will only be anywhere from 6 to 10 inches wide when finished, you can cut 2 or 3 strips from one piece of fabric and sew the lengths together to give you the total length you need. If you aren’t in to sewing, you can use heat fused stitching tape. We always check the sale tables at places like Bed, Bath and Beyond first for pre-made window scarves, as they require no sewing. Get 2 if they are too short, there are many ways to “tie them together” to get the length you need. You can also get creative with table cloths, flat bed sheets or scarves. When staging your home to sell, you’ll want to choose light, airy and colorful fabrics that blend with your home’s style and décor. You don’t want to cover your view, just enhance the window.
Create your valance by sewing or fusing your fabric pieces to achieve the total length you need. Fold your fabric in half lengthwise, right sides together, and trim to the desired width, allowing ½ inch or so for seam allowance. Now stitch across the raw edges and turn right side out. When finishing the ends, turn raw edges under and stitch close to the edge. Your valance is now ready to hang!
Install a small nail with a head to each upper corner of your window an inch above and outside of the frame. Leave enough nail protruding to hook your fabric on to so you can stand back and check for evenness. Drape the valance across the top of the window, hooking the fabric onto the nails. Make sure your drop is the same length on both sides. Grab the fabric where it sits on the nail, and bunch it up to make a “rosette”. Secure the rosette by wrapping a rubber band around the knot of fabric. Fluff out the fullness of the rosette, and hang from the nail with the rubber band. Repeat for the other corner. To finish, apply double stick tape to the wall across the top of the window and smooth the fabric against the tape. VOILA! Instant charm!

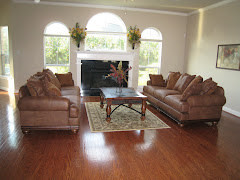
This example shows how we used 2 premade window scarves to create a lovely showcase for the view from these windows. The ends were brought together in the center of the treatment, creating a keystone center. This treatment took about 10 minutes to hang and cost about $20.


No comments:
Post a Comment